INTRODUCTION
The peri-implant tissue is an adaptation of the masticatory mucosa. It is composed of connective tissue coated by layers of epithelial cells that attach to the implant surface forming the junctional epithelium. Gingiva around teeth and peri-implant
mucosa has been shown in human studies to have similar epithelial and connective organization. The surgical trauma delivered to soft and hard tissues during implant placement can influence the future esthetic result. The clinician should use surgical
techniques that prevent esthetic complications, such as increased crown length or loss of interdental papillae, without compromising osseointegration. The present article describesORIGINAL CASE.
CLINICAL REPORT
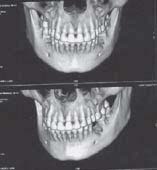
A 24 year female patient reported to the Department of Periodontics and Implantology, D.J College of Dental Sciences & Research,Modinagar with missing left mandibular first molar 36 (fig.1 & 2)and wanted to get it replaced as she was to get married in three and half month from the day she reported. Diagnostic impressions
 | Pre Op Denta Scan
 |
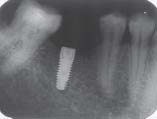 | Post Op IOPA (3 months Post Insertion) (Figure 1)
|
 | Figure - 2 (Pre operative)
|
of upper and lower arches were made and the casts were poured. Oral prophylaxis was done on the same sitting, brushing technique was demonstrated oral hygiene maintenance home care instructions were explained and chlorhexidine mouth rinse was prescribed. Patient was recalled after one week for implant placement. Dentascan revealed good quality and quantity of
bone and distance from the mandibular canal. Bone mapping was carried out in 36 to asses the width of edentulous ridge. Based on the investigation and clinical evaluation it was decided to place an implant in relation to 36 with
dimension 4.50 mm diameter and 11.5 mm cylindrical form-LEADER, ITALIA.
SURGICAL PROCEDURE
Under local anaesthesia The incision was made from the distofacial flap margin, 1 to 2 mm from the tooth adjacent to the edentulous space, and extended palatally/lingually and a curvilinear fashion to a point approximately 4 mm palatal/
lingual to the alveolar crest.The other side of the incision was made in a similar manner. To severe the periosteum at the
palatal lingual extent, the incision was thenredrawn with the scalpel tip. The palatal ends of the incisions were connected with a horizontal cut that extendeddown to bone. The mucoperiosteal flap was detached using a mall elevator, avoiding harm to the papillae and any other traumatic manipulation. The muco-periosteal flap was elevated to the extent required for placement of the implants. The flap could be extended to allow inspection of bone contours on the labial aspect if there was concern
that the cortical plate may be perforated during preparation of the implant site After flap reflection the optimal implant
location as decided pre-surgically by pretreatmentimaging modalities was reaffirmed with the presurgical prosthetic guide template & the site was then marked with a surgical round bur (Fig.3).
 | Figure - 3 (Mark with pilot drill)
|
A low speed, high torque hand piece and copious irrigation were applied to prevent excessive thermal injury to bone. Externally and internally irrigation with sterile saline directed through the drills were used. After marking the site, the pilot drill (D-2.O
mm) was put to use for creating a osteotomy site of the 11.5mm depth for implant placement. When appropriate depth was reached with the pilot drill, the implant depth probe was used for tactile perception of intact bony plates the confirmation
of desired osteotomy depth.Once desired depth was confirmed, paralleling pins were placed to check the proper alignment
of the implant with adjacent teeth & opposing occlusion.
After confirmation of depth & angulation, the osteotomy site was prepared by a series of gradually larger drills (D2.8, D3.2, D3.8, D4.2)to the requisite width The Implant site was generously irrigated with sterile saline to remove any residual bone chips/ other residue following preparation. The implant was then pressed into the prepared site with manual pressure aided by the insertion mount & insertion tool attached to the implant head.]
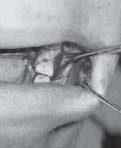
Following which, the insertion mount was removed and hex driver was placed into the implant internal hex & ratcheted with torquecontrolledimplant ratchet (Fig.4). Implant was never forced into the socket with excessive force as the cover screw, provided with the implant package was then placed using the hex-driver using finger pressure. At this point, implant was confirmed to be immobile, which re-affirmed primary implant stability (Fig.5).
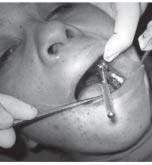 | Figure - 4 (Implant Placement with Ratchet)
|
 | Figure - 5 (Implant in Situ)
|
The flap margins were then repositioned & sutured tension free using 3-0 mersilk in interrupted fashion.
A radiograph was taken post operatively to evaluate the implant angulation & position in relation to adjacent structures such as nasal floor, sinus, inferior alveolar canal and adjacent teeth. Sutures were removed after one week. Patient was recalled after three months. INTRA ORAL RADIOGRAPH was taken which showed complete osseointegration of implant Elastomeric impressions were made and casts were poured in Die-stone.
Metal ceramic prosthesis were fabricated and luted with Glass Ionomer Cement. Occlusion was checked to have contact only
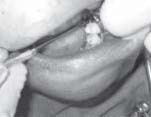
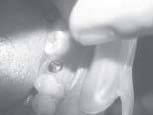
on heavy biting force in centric occlusion position and not to have contacts in all other eccentric positions (Fig.6, 7, 8 & 9).
 | Figure - 6 (Gingiva former)
|
 | Figure - 7 (Peri - implant soft tissue)
|
 | Figure - 8 (Abutment)
|
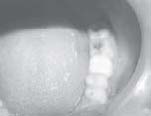 | Figure - 9 (Prosthesis in Situ)
|
DISCUSSION
Placement of dental implants into healed sockets with limited flap design was first introduced by German Gomez-Roman, Dr med dent in 2001. The advantage of this flap design is to reduce the trauma to the soft tissue, preserving the interdental papilla and most of all minimizing interproximal crestal bone loss. However a careful case selection, proper treatment plan, meticulous
surgery and proper design of prosthesis and last but not least maintainence of strict asepsis are essential for optimal outcomes when this approach is adopted.
SUMMARY
Current researchers have shown that limited flap design the interproximal crestal bone loss was of practical importance and statistically significantly less as compared to the widely mobilized flap procedure. A technique for restoring the partial edentulous space with dental implant using limited flap design is presented here. This technique reduces soft tissue trauma,
operating time, bone loss and preserve papilla. Most of all patient compliance relating to surgery and esthetics both. |