Introduction
Orbital defects or loss of an eye could be because of congenital reasons, trauma or infection[1],[2]. It hampers the day to day activities, and also compromises the physical and emotional well being of a patient[3],[4],[5]. Depending on the severity, there are different surgical modalities which cause orbital defects such as evisceration or enucleation. Evisceration involves the removal of contents of the globe leaving in place the sclera and sometimes the cornea. Enucleation involves removal of the entire globe after the extraocular muscles and the optic nerve have been transected. The surgeon should preserve as much intact orbital content as possible[1],[5]. Various techniques are used in fabricating ocular prostheses but the main disadvantages of these techniques is that it is difficult to adequately match the iris to make it esthetically pleasing[3],[4].
Case Report
A 22 year old female patient reported to the department of Prosthodontics, College of Dental Sciences, Davangere with a loss of left eye. She gave a history of trauma due to an accident. Surgery was performed and a conformer was given soon after the surgery.
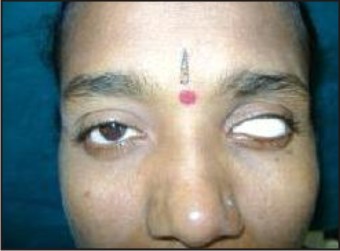
On examination, the socket was healthy and with adequate depth for proper retention of the prosthesis. Mobility was also observed with the movement of the natural eye (Fig. 1 & 2).
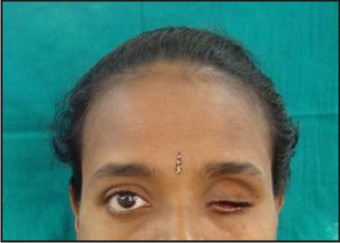 | Fig. 1 : Preoperative View
 |
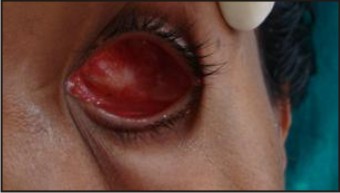 | Fig. 2 : Anophthalmic Socket
|
Technique
The first step involved making an impression of the anophthalmic socket using light bodied elastomeric impression material (Aquasil, Dentsply) under the eyelids to completely fill the socket. A 5ml disposable syringe was incorporated into the impression for retention and the patient was instructed to perform eye movements before the impression material set. The ocular impression was retrieved from the socket and evaluated (Fig. 3). The impression was poured till the height of contour with Type III dental stone (Kalstone-Karson Pvt Ltd Mumbai,India) . Then holes were created in the first layer of dental stone, separating media was applied and a second layer of dental stone was poured to obtain a three piece dental cast .
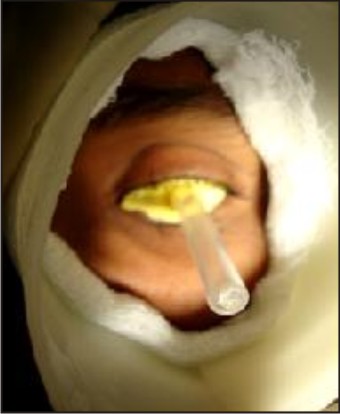 | Fig. 3 : Impression Using Light Body Polyvinyl Siloxane
|
The wax pattern was obtained by pouring molten modeling wax into the mold (Modelling wax, Hindustan Pvt Ltd). The wax pattern was retrieved, sharp ridges and irregularities were removed. The wax pattern was then placed in the socket and the fit was evaluated by lifting the eyelids and even extensions into the medial and lateral fornices were evaluated (Fig. 4).
 | Fig. 4 : Trial Of Scleral Wax Pattern
|
Wax pattern sculpting was performed until it resembled the natural eye and the pattern was processed using white heat cure acrylic resin (DPI tooth moulding powder) to obtain the scleral portion of a similar shade as that of the natural eye.
The acrylic resin sclera was inserted in the socket; eye support, tissue extensions and eye movements were checked (Fig. 5). The patient was made to sit upright in a relaxed position and to look straight ahead. Measurements were made between the medial and lateral canthus to pupil of the natural eye and marked on the scleral acrylic resin.
 | Fig. 5 : Trial Of The Acrylic Scleral Blank
|
A digital photograph of the patient’s iris using a digital camera was made and the photo print of the iris was compared with the natural eye in relation to brightness, colour and contrast.
The image was printed on a white photo paper of different sizes that matched with the natural eye (Fig. 6). An iris sized circle was created on the acrylic sclera the same as the natural eye. The anterior scleral surface was reduced by 1mm, the photographic iris was cut and transferred to the scleral surface at a distance the same as the natural eye. Characterization of the prosthesis was done using professional quality colour pencils. Red nylon threads were added for characterization and permanent markers were also added to replicate the natural eye. The prosthesis was covered with clear self cure acrylic resin and finishing and polishing was done to retain the characterization.
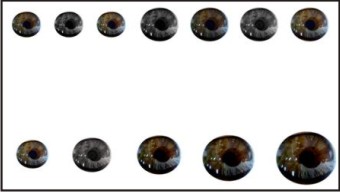 | Fig. 6 : Iris Images Of Different Sizes And Shades Printed On Photopaper
|
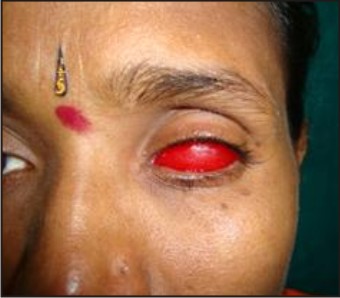
The patient was instructed to wear the prosthesis day and night and to clean it with mild soap and warm water and to visit at regular intervals for follow up and adjustment if necessary (Fig. 7).
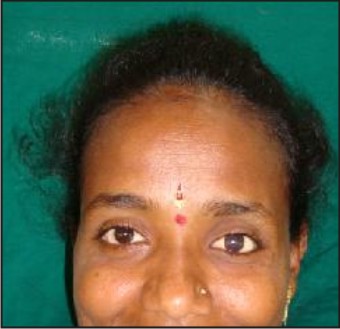 | Fig. 7 : Custom Ocular Prosthesis In Place
|
Discussion
The loss of facial structures compromises individual esthetic outcomes and in some cases also leads to social exclusion[4],[6]. During removal of an eye, the surgeon should preserve as much of the remaining structures as possible. Prosthetic rehabilitation with implants and eye prosthesis are the treatment of choice as they also simulate eye movements. If implants are considered, the size of implants plays a vital role - larger implants lead to an exophthalmic appearance and extrusion and too small implants cause shrinkage of the contents of eye. But due to economical factors, all patients cannot afford implants[1],[2],[6]. A custom made ocular prosthesis is hence a good option[2],[7]. The main disadvantage of using a prefabricated iris is that it is difficult to replicate or match the iris of the natural eye[3]. Most clinicians believe that selection of pigments and the iris painting procedure requires an artistic skill and knowledge of colour and if unsuccessful, can impair esthetics [8],[9],[10]. The use of the digital photography technique provides an esthetically pleasing result [5],[8],[9],[10]. It is simple and less artistic skills are required in this technique [5]. A special digital camera for photography and computer software are the only requirements for matching the size and colour of the iris. According to literature many techniques and materials have been used to fabricate an ocular prosthesis using a prefabricated and custom made ocular prosthesis, however digital photography is simple, less time consuming and provides an optimum esthetic result[5],[8],[9].
Conclusion
Fabricating a custom ocular prosthesis is the best option for a patient with an ocular defect and there are several options of reproduction of the iris. The technique described here, using digital photography, is simple, easy and less time consuming. The artistic skills required are also minimal. Advanced research is required on the durability of the paper and colours used in modification of the iris for characterization. The ultimate goal is to restore the natural appearance of the healthy eye as well as to restore the patient’s emotional and psychological well-being.
References
1. Parr GR, Goldman BM, Rahn AO. Surgical considerations in the prosthetic treatment of ocular and orbital defects. J Prosthet Dent 1983; 49: 3: 379-85.
2. Cain JR. Custom ocular prosthetics. J Prosthet Dent 1982; 48: 690-4.
3. Taicher S, Steinberg MH, Tubiana I. Modified stock eye ocular prosthesis. J Prosthet Dent 1985;54:95-7.
4. Shaikh SR, Gangurde AP, Shambharkar VI. Changing ocular prostheses in growing children : A 5 year follow up clinical report. J Prosthet Dent 2014;111:346-8.
5. Artopoulou LL, Montgomery PC, Wesley PJ, Lemon JC. Digital imaging in the fabrication of ocular prosthesis . J Prosthet Dent 2006; 95: 325-30.
6. Benson P. The fitting and fabrication of a custom resin artifical eye. J Prosthet Dent 1977; 38: 5: 532-8.
7. Sykes LM. Custom made ocular prostheses: A Clinical Report. J Prosthet Dent 1996;75:1-3.
8. Jain S, Makkar S, Gupta S, Bhargava. Prosthetic Rehabiliation of ocular defect using digital photography: A case report. J Indian Prosthodont Soc 2010; 10: 3:190-3.
9. Buzayan MM, Ariffin YT,Yunus N, Mahmood WA. Ocular defect rehabilitation using photography and digital imaging:A Clinical Report. J Prosthodont 2014 Oct 14. doi: 10.1111/jopr.12235.
10. Jayaswal GP, Dange SP, Khalikar AN. Restoration of an atrophic eye socket with custom made eye prosthesis, utilizing digital photography. Indian J Res 2011; 22:482-5.
|