Introduction:
Charles Reade rightly said that beauty is power; a smile is its sword. Hence a confident smile is one of the most important aspects of one’s personality. Various options are available to treat situations that involve the esthetic zone. Porcelain laminate veneers (PLV) can be successful treatment options for problems in the anterior region. Porcelain laminate veneers offer satisfactory, predictable and lasting results, provided that the case selection is appropriate along with correct clinical and laboratory techniques[1]. The estimated survival probability of porcelain laminate veneers over a period of 10 years is 91% (Dumfahrt & Schäffer, 2000) [1]
Porcelain laminate veneers were introduced into dentistry by Pincus around 1938. With the introduction of acid etch technique by Buonocore in 1955 and silica resin direct filling material by Bowen in 1958, PLV gained a lot of interest[2]. In the late 1970s direct and indirect laminate veneers were introduced. Direct veneers used light cured composite resin to cover the entire facial surface. Though this technique allowed greater flexibility with respect to shaping and shading the teeth, it was time consuming and required artistic skill. In addition, composites exhibited poor colour stability and wear resistance[2].
With respect to PLV, there were early concerns about the fragile nature of the thin shells of ceramic. However these fears have been allayed as multiple clinical reports have documented good to excellent clinical success[3]. This has been seconded by Strassler & Nathanson in 1989, by Peumans et al in 2004, by Dunne & Millar in 1993 and by Maria Granell-Ruiz et al in 2010.
The advantages of PLV include minimally invasive preparations, high levels of esthetics and ability to achieve a good tissue response. On the other hand PLV also have certain limitations such as being technique-sensitive and time-consuming, are fragile before cementation, repair is not easily done, and they are less cost effective. Porcelain laminate veneers may be indicated in areas traditionally restored with single crowns or composite resin veneers for the following: correction of diastema, masking discolored or stained teeth, masking enamel defects and correcting malaligned or malformed teeth [2].
The ultimate goal during tooth preparation is to remove a uniform layer of the tooth structure[4]. Also, the degree of discoloration to be masked plays a significant role in determining the amount of tooth reduction. Tooth preparation involves labial, proximal, cervical and incisal reduction.
Traditionally, the labial enamel is reduced by 0.3–0.5 mm, which enables a strong enamel bonding and, at the same time, sufficient thickness of porcelain is maintained. The cervical preparation can either be supra gingival or sub gingival with a chamfer finish line[5],[6]. Depth cutting burs of different gauges (0.3mm, 0.5mm, 0.7mm) are available to aid in labial reduction. When the shade difference between the tooth after preparation and the desired final restoration is minimal, proximal chamfer finish lines are placed slightly labial (approximately 0.2 mm) to the contact areas of the adjacent tooth[1].
However, controversy exists as to whether the incisal edge is to be covered or not in preparations for PLVs. Some clinicians advocate the preservation of incisal edge while others prefer to overlap the incisal edge. Hence different types of incisal preparation have been proposed for PLVs [5]:
1) Window or intra-enamel preparation: extended close to but not involving the incisal edge. The advantages are retention of the natural enamel over the incisal edge
2) Feather-edge incisal preparation: the veneer is extended to the height of the incisal edge but the edge is not reduced. The advantage is that guidance of the natural tooth is maintained
3) Beveled preparation: a labio-palatal bevel is prepared across the full width of the incisal edge, with some reduction of the incisal length of the tooth. Advantages include ability to modify the incisal esthetics and to provide a positive seat during try-in and cementation of the veneer.
4) Incisal butt preparation: is advocated for better esthetics, stress distribution and positive seating.
Several studies were unable to find any survival differences among different incisal preparation designs. A recent long-term study by Smales and Etemadi also found a statistically insignificant survival difference between PLV placed with or without incisal coverage. There are probably other factors, like the amount of enamel left for bonding, cementation technique, occlusal factors and eating habits, which play a more dominant role in the longevity of the veneers[7],[8]. However Rucker et al found that better long-term survival rates were noticed for teeth with incisal coverage[8].
This case report focuses on 2 cases: restoration of discolored maxillary anteriors that occurred due to fluorosis and altering the size and shape of maxillary lateral incisors.
Case Report 1:
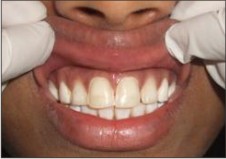
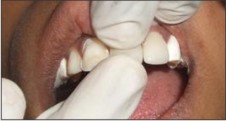
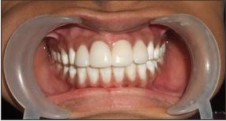
A 17 year old girl reported to the Department of Prosthodontics, DAPMRV Dental College, Bangalore with the chief complaint of discolored upper central and lateral incisors. The patient was unhappy with her appearance and smile and hence wanted this discolouration to be corrected (Figure 1). On examination it was found that the maxillary incisors were extensively discolored with the canines exhibiting mild discolouration. At the time of recording the patient’s history, it was elicited that she belonged to Kolar district of Karnataka state, which is a part of the fluoride belt.
After thorough examination, impressions for diagnostic models were made in irreversible hydrocolloid. PLVs were decided as the treatment option after discussion with the patient. The patient opted for correction of only the maxillary central and lateral incisors as finances were a constraint and visibility of the canines was not as much.
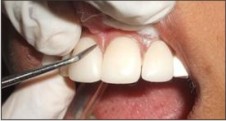
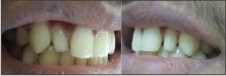
Oral prophylaxis was done at the start of treatment. Before proceeding with tooth preparation, the appropriate shade was selected using Vitapan shade guide. The maxillary teeth were then prepared starting with the right lateral incisor, right central incisor, left central incisor and lastly the left lateral incisor. The labial reduction was about 0.5 mm and the cervical margin was slightly subgingival with a chamfer margin. The preparation involved the incisal edge to form a butt joint lingually. The incisal overlap design was not chosen as there were interferences during protrusion. Sharp angles of the preparation were removed using round end tapered finishing diamond (Figure 2).
Gingival retraction was done using a “00” retraction cord (Ultrapak). An impression was made using Poly vinyl siloxane impression material. Temporary restorations were not given as the preparations were shallow and involved only the enamel.
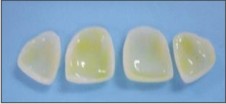
The PLV was fabricated using pressable ceramics. After fabrication, the PLVs were tried in the patient`s mouth. Once the fit and shade were found to be satisfactory, the veneers were prepared for cementation.
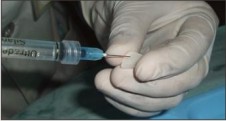
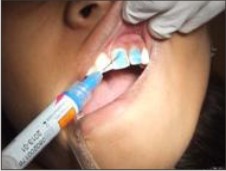
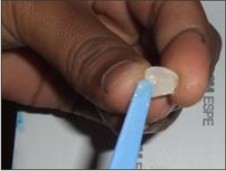
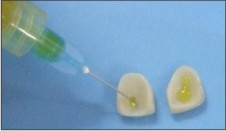
The inner surface of all the laminates was etched with hydrofluoric acid (Figure 3). A silane coupling agent (ultradent) was then applied and gently air dried (Figure 4). The central and lateral incisors were etched with 37% phosphoric acid (Figure 5). A bonding agent was applied to the etched enamel and light cured. A thin layer of dual cured resin cement (Rely X) was placed on tooth side of the veneers (Figure 6). Light finger pressure was used to place the veneer on the tooth moving from right to left (Figure 7). Seating was verified and excess cement was removed (Figure 8). The veneers were then exposed to curing light for 60 seconds each from the facial and lingual directions (Figure 9). Final finishing was done using abrasive rubber and porcelain polishing cups (Figure 10), (Figure 11).
 | Figure 1: Pre Treatment Photograph
 |
 | Figure 2: Prepared Central And Lateral Incisors
|
 | Figure 3: Etching Of The Veneers Using Hydrofluoric Acid
|
 | Figure 4: Application Of Silane Coupling Agent
|
 | Figure 5: Acid Etching The Tooth With Phosphoric Acid
|
 | Figure 6: Loading The Laminate With Dual Cure Relyx Resin Cement
|
 | Figure 7: Seating The Laminate
|
 | Figure 8: Removing Excess Cement
|
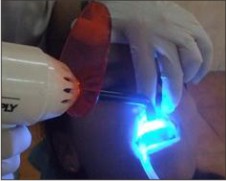 | Figure 9: Light Curing The Resin Cement
|
 | Figure 10: Close Up Of The Finished Restoration
|
 | Figure 11: Finished Restoration
|
Case Report 2:
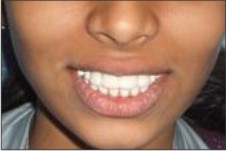
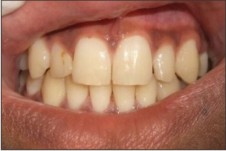
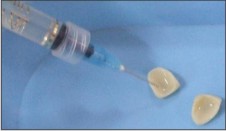
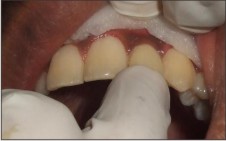
A boy aged 18 years reported to our department with the chief complaint of small size and altered shape of his maxillary lateral incisors (Figure 12). After preliminary impressions were made, a diagnostic wax up was done to decide the shape and size of the restorations. Similar procedures as mentioned above were followed for this case also except that the lateral incisors were prepared with an incisal overlap design as there were no interferences during protrusion (Figure 13), (Figure 14), (Figure 15), (Figure 16), (Figure 17), (Figure 18).
 | Figure 12: Pre-preparation Picture
|
 | Figure 13: Tooth Preparation
|
 | Figure 14: Treatment With Hydrofluoric Acid
|
 | Figure 15: Application Of Silane Coupling Agent
|
 | Figure 16: Placing The Resin Luting Cement
|
 | Figure 17: Cementing The Laminate
|
 | Figure 18: Finished Restoration
|
Conclusion:
The final restoration by porcelain veneers resulted in an esthetically pleasing smile without the need for extensive loss of tooth structure. These case reports demonstrate that superior esthetics can be achieved, with a conservative approach, taking advantage of an excellent material like porcelain. In the first case, the discoloration of the maxillary incisors was successfully masked while in the second case, the shape and size of the lateral incisors were esthetically restored.
References:
1. Bhoyar AG. Esthetic Closure of Diastema by Porcelain Laminate Veneers: A Case Report. People’s Journal of Scientific Research 2011; 4(1): 47-50
2. Aschheim KW, Dale BG. Porcelain laminate veneers and other partial coverage restorations In: Aschheim KW, Dale BG, editors. Esthetic dentistry A clinical approach to techniques and materials. 2nd ed. pp 151-184. Mosby.
3. Porcelain Veneer Preparations: To Prep or Not to Prep. Edward A. McLaren. Inside Dentistry—May 2006 http://www.edmclaren.com/Pubs/PDFs/Porcelain_Veneer_Preparations.pdf
4. Magne P, Belser UC. Novel Porcelain Laminate Preparation Approach Driven by a Diagnostic Mock-Up. J Esthet Restor Dent 2004; 16:7–18.
5. Shetty A, Kaiwar A, Shubhashini N, Ashwini P, Naveen, DN, Adarsha MS, et al. Survival rates of porcelain laminate restoration based on different incisal preparation designs: An analysis. J Conserv Dent. 2011; 14(1): 10-15.
6. Hahn P, Gustav M, Hellwig E. An in vitro assessment of the strength of porcelain veneers dependent on tooth preparation. J Oral Rehabil. 2000; 27:1024-9.
7. Dhanda M, Srivastava M, Dobhal A, Sharma N. Ceramic Laminate Veneers: A Conservative Approach to Esthetics. Indian Journal of Dental Sciences 2011; 3(1):20-22.
8. Ho,EHT. Porcelain veneers: an overview with a case presentation, Hong Kong Dental Journal 2007;4:47-57
9. Peumans M, Van Meerbeek B, Lambrechts P, Vanherle G. Porcelain veneers: A review of literature. J Dent. 2000; 28:163–77.
|