Introduction
The highly resorbed residual ridge is the scourge of prosthodontists. Swenson stated, "The ideal ridge is one that is broad on its bearing surface and has practically parallel sides".[1] Seldom are such ridges encountered by prosthodontists. Deterioration of this ideal ridge is frequently encountered, because of multiple factors, which may be local or systemic. Stability of lower denture in such cases is usually the distinguishing factor between success and failure.
The natural teeth and ridges or dentures provide support which is responsible for the external form of the lips and cheeks. The muscles become weak and do not function properly, if the lips and cheeks are unsupported, due to which there will be wrinkling of skin and sagging of lips and cheeks. Due to aging, a prosthodontist has to handle a whole lot of problems like loss of teeth, alveolar process, tonicity of musculature, elasticity of skin as well as impairment of function.[3]
Time to time, dentists have come up with various techniques to overcome these problems in some way or the other .This article describes a clinical report whereby, a customized treatment approach was used at every step of complete denture fabrication for a patient presenting with resorbed ridges, so as to provide him with a successfully functioning prosthesis
A Case Report
A seventy year old male patient reported to Department of Prosthodontics at D.A.V (C) Dental College and Hospital, Yamunanagar with chief complaint of unstable lower complete denture and inability to chew food and was also insisting on improving his aesthetics. History revealed that he was wearing that denture since last ten years. On examination, it was found that the patient had highly resorbed mandibular ridge (Class IV) with poor aesthetics, unsupported oral musculature and slumped cheeks. After thorough evaluation of the patient’s history, radiographs and existing clinical conditions, an appropriate and detailed treatment plan was formulated, keeping in mind all the patient’s needs and desires.
Since the patient had severely resorbed mandibular ridge, the complete denture should be such , that it should cover as large area as possible to distribute masticatory forces and at the same time ,it should not conflict with the adjacent muscles, which otherwise tend to displace it. Thus, a primary functional impression was made without using tray, so as to have an impression free from distortion that stock tray may cause.
To overcome the problem of denture instability, physiologically appropriate teeth arrangement within neutral zone was done, so that teeth donot interfere with normal oral and peri-oral muscle activity .This stabilizes and retains the denture rather than displacing it.
Special considerations were given for aesthetics to overcome the problem of sunken cheeks, by supporting them with removable cheek plumpers. Instead of conventional cheek plumper as a single unit prosthesis with extensions on either side on the buccal surfaces of the denture, magnet retained plumpers as separate portions were planned to compensate for the loss of buccal pad of fat in cheek region.
Technique
1. Impression using metallic core: A 2-mm thick metal wire was adapted to the curve of the mandibular arch from one retromolar pad to the other, to serve as core for impression and a small loop was incorporated in the anterior part to serve as a handle. To confirm its stability, the wire was seated in the mouth, and the patient was asked to pronounce certain speech sounds, principally /S/ sounds.[4] (Fig. 1a)
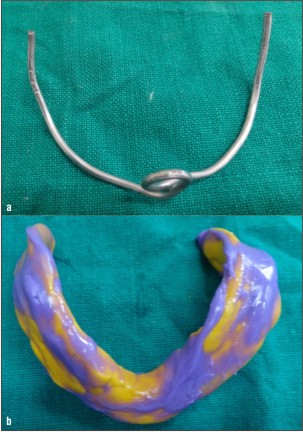 | Fig.1 a: Metallic core adapted along the residual ridge b. Final preliminary functional impression
 |
Then the adhesive was applied on the wire and extra heavy-viscosity impression (Addition Vinyl Polysiloxane, Dentsply) material was formed into a roll around the wire and the prepared core was placed in the patient's mouth. After confirming the correct position, the patient was asked to close the mouth slowly and gently push the tongue forward to touch the lower lips, and the fingers were withdrawn. Patient was then asked to recite the days of the week several times slowly and clearly, to functionally mould the material by muscles.
Following polymerization, after the stability was obtained, additional material was added and adapted to those regions which were not captured in the first impression and molded to create extensions by phonetic molding as done earlier. After a properly extended impression was obtained, its stability and retention was checked and confirmed. A final wash impression was made using a low-viscosity silicone material. Thus the impression was completed in three phases: main body, extension and surface wash (Fig. 1b). Then, the maxillary impression was made in usual manner using impression compound .The impressions were then boxed, poured and casts were obtained. Then, custom trays were constructed on these casts, followed by border molding and final impression with admix technique.
2. Jaw Relation and Neutral Zone: The impressions were poured in dental stone and denture bases were made on the master casts, over which wax occlusion rims were constructed. The vertical dimension of occlusion was registered by conventional methods and casts were articulated. The upper occlusion rim was returned to the articulator. On lower record base, the wax was removed and superstructure was constructed using auto polymerizing acrylic resin, comprising two pillars in the premolar region with short vertical fin between them along the centre of denture base. This helped to provide even occlusal stops at the correct vertical dimension of occlusion and support the neutral zone impression material .[5]
Tissue-conditioning (Visco-gel temporary soft denture liner, Dentsply) material was used according to the manufacturer’s instructions along the denture base and superstructure to cover acrylic fin and the rim was placed in the patient’s mouth along with maxillary wax rim. The patient was instructed to close in centric occlusion as guided by the acrylic shin stops. During this period the patient was instructed to: smile, grin, pout/purse lips, count from 60 to 70, talk aloud, pronounce the vowels, sip water, swallow, slightly protrude the tongue and lick the lips. Forces exerted mold tissue conditioner into the shape of the neutral zone (Fig.2). These actions were repeated until material had set. The rim was removed from the mouth and minor deficiencies were corrected by the addition or removal of tissue conditioner.[5]
 | Fig. 2 : Recording neutral zone with tissue conditioner
|
The neutral zone impression was then replaced on the master model, locating grooves were cut and a silicone putty index was prepared around the impression. The tissue conditioner impression was then removed from denture base and wax was poured into this space, giving an exact representation of neutral zone. Teeth arrangement was completed according to the index and their position was checked by placing the index around the wax try-in (Fig. 3).[6]
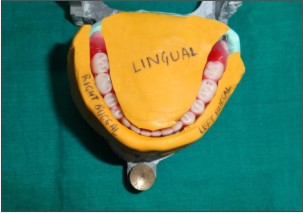 | Fig. 3 : Teeth arrangement according to neutral zone index
|
3. Try-in and cheek plumpers; After satisfactory try-in was done, wax rolls were placed in the disto-superior aspect of maxillary buccal flanges. Cheek fullness and vestibular extension was evaluated and patient approval was taken for comfort, function and aesthetics. Magnets (cobalt-samarium; Master Magnetics, Inc., The Magnet Source) were attached to the wax rolls and waxed up (Fig 4). The maxillary and mandibular trial dentures were waxed up, flasked and dewaxed. The heat cure acrylic resin was packed by taking care not to dislodge the magnets.[7]
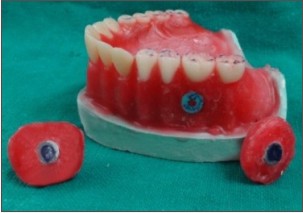 | Fig. 4 : Wax up of the denture with magnets attached to wax rolls
|
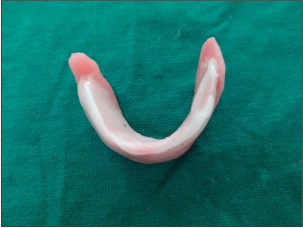
4. Insertion: During final insertion, the denture was fully inspected and a check record was made to eliminate any minor occlusal errors. The denture provided the patient with improved facial appearance, stability and retention during function as they have been constructed in anatomic and functional harmony with their surroundings (Fig.5 & 6).
 | Fig. 5 : Finished prosthesis with magnetic cheek plumpers
|
 | Fig. 6 : Pre-rehabilitation and post rehabilitation intra-oral view
|
Discussion
Making a definitive impression of an edentulous arch can be challenging when the residual ridges present with less-than-ideal conditions, especially when there is minimal bone height, unfavorable residual ridge morphology and/or unfavorable muscle attachments. Due to the anatomical differences between the maxilla and the mandible, as well as the differences in primary and secondary load-bearing areas, impressions of mandibular ridges with resorbed ridge require special considerations.[8]
Mandibular primary impressions of severely resorbed edentulous ridges are difficult to manage well with stock trays. So a functional impression technique was used whereby, the impression material was formed by the patient's own musculature without any distortion from the stock tray or the operator's fingers. Such a functional impression gains support area that is as large as the active surrounding muscles permit, without any constraint imposed by fingers or borders of stock trays.[4] Thus , it avoids undue displacement of soft tissues and unbalanced extensions and also provides stability with the resulting denture. Moreover, since the patient takes an active part in the procedure, he feels relaxed, comfortable, and confident because of the stability of the completed impression.[4]
Next, neutral zone was recorded with an aim to construct a denture in muscle balance, as muscular control will be the main stabilizing and retentive factor during function. This technique enables to construct a denture that is shaped by muscle function and is in harmony with the surrounding oral structures.
As the patient ages, the loss of support of the facial musculature is of great concern to the patient and carries a great social stigma. Aging causes tissue atrophy, folds and creases of face become exaggerated which is due to loss of support by the alveolar bone and teeth in particular leading to collapse of lower third of face. There is deepening of naso-labial folds, drooping of corner of mouth, loss of vermilion border, depression of lips with exaggerated wrinkling[9]. Teeth loss in posterior region results in loss of support to the cheeks, which tend to move medially to meet lateral expanding tongue.[10] Cheek contour changes as a result of loss of vertical dimension of occlusion due to anterior teeth loss. Loss of subcutaneous fat and elasticity of connective tissue produces the slumped cheeks.[3]
This clinical report indicated that a magnet retained cheek plumper prosthesis has potential as a treatment method to alleviate the problems caused by aging and the resultant loss of muscle activity associated with such aesthetic impairment. It improves the appearance of the patient by reducing sagging of cheeks and improving the muscle tone and has the greatest advantage of boosting the self esteem of the patient.
The advantages of using magnet retained removable cheek plumpers over conventional are that these are smaller in size, easy to place within dentures, do not cause excessive muscle fatigue and can be easily removed and cleaned.
Thus, an attempt was made to create dentures that were in harmony and dignity of the aging patient, which would compliment, not eradicate the stigma of aging in him.
Summary
As the life expectancy of general Indian population is increasing, the number of complex complete denture cases is also increasing. So, the treatment of these complex cases needs to move away from traditional denture construction to an alternative approach to have a satisfactory denture. Thus, a customized approach was used for this patient to cater his problems faced in the previous denture. This article has shown relatively simple yet effective clinical techniques whereby a denture resting on an atrophic mandibular ridge may be modified to improve function, comfort, appearance and health to have a successfully functioning prosthesis, complying with the definition of prosthodontics. All this have an enormous impact on the patients' personal lives and are rewarding for the prosthodontist who is providing this care.[3]
References
1. Luthra RP, Gupta R, Vashisht D, Sharma N, Gupta R: Unemployed Residual Ridge: Indian Journal of Dental Sciences. 2011; (3):4-5.
2. Praveen G., Gupta S., Agarwal S, Agarwal S. K.: Cocktail Impression Technique: A New Approach to Atwood’s Order VI Mandibular Ridge Deformity: J Indian Prosthodont Soc 201;11(1):32–5.
3. Sunil Kumar M V, Rao H., Sohi K. S.: Artificial cheek plumpers: A step ahead in denture aesthetics – a case report. Indian J Stomatol 2011; 2(2): 134 –7.
4. Aiche H.: A Preliminary functional impression for the mandibular complete denture: Int J Prosthodont 1989:2:543-8.
5. Gahan M. J., Walmsley A.D.: The neutral zone impression revisited. BDJ 2005;198(5):269-72.
6. Razek M. K. A., Abdalla F.:Two-dimensional study of the neutral zone at different occlusal vertical heights. J Prosthet Dent 1981;46(5): 484-9.
7. Chakravarthy R.: Magnet Retained Sectional Lip Plumper Prosthesis for A Patient With Hemi-Mandibulectomy: A Clinical Report. Journal of Clinical and Diagnostic Research. 2010 ;(4):2582-6.
8. McGarry TJ, Nimmo A, Skiba JF, Ahlstrom RH, Smith CR, Koumjian JH. Classification system for complete edentulism. The American College of Prosthodontics. J Prosthodont 1999;8:27-39.
9. Tautin F.S. Denture aesthetics is more than teeth selection. JPD 1978;40:127-130
10. Martone A. L. Effects of complete denture on facial aesthetics. J Prosthet Dent 1964;14:231-5.
|