Introduction
An auricular defect can be caused by any of several conditions, including trauma, congenital
Malformation, or surgical removal of a neoplasm[1]. One treatment option is to fabricate an auricular prosthesis, a procedure requiring impressions of both the affected and unaffected ears. Several impression techniques have been advocated, including the use of plaster in a 2-piece mold, reversible hydrocolloid enclosed by a wax collar, irreversible hydrocolloid reinforced by a plaster matrix, and irreversible hydrocolloid contained in a wax or thermoplastic ring.1-6 Minimal distortion of the impression and cast accuracy are important criteria for achieving a successful prosthesis.
This article presents an outline of the procedures involved in constructing anear prosthesis employing a customised three-piece stone mould for processing room temperature vulcanized silicone. The critical steps are emphasized in making the impression, sculpturing, and processing procedures to insure the quality of the prosthetic replacement.
Case Report
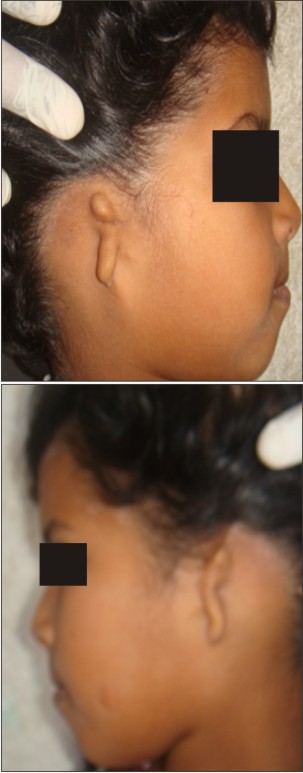
A 8 year old patient registered to the Department Of Prosthodontics, A.B. Shetty Memorial Institute of Dental Sciences with history of bilaterally missing ears since birth (Figure 1) The option chosen was direct adhesive fixation of the prosthesis due to economic and age of the patient.
 | Figure 1
 |
The prosthesis was fabricated in following steps.
Impressions
The patient was seated in dental chair in a near supine position and draped to protect her clothing during impression procedure[2].
The vertical and horizontal coordinates were marked with an indelible pencil on both of the defect side (Figure 2). These will help in proper orientation of wax form of prosthetic ear. Petroleum jelly or other lubricants were applied to the hair surrounding the area. The external auditory meatus was blocked with a cotton pellet or small sponge. The head was rotated so that the defect lies in the horizontal plane.
 | Figure 2
|
An irreversible hydrocolloid impression material (DeTrey Zelgan 2002, Dentsply, UK) was used to record the defective side ear. A rigid impression tray was fabricated using either a plastic tub (Reprosil Putty container; Dentsply International Inc, Milford, DE) with the bottom removed or a piece of polyvinyl chloride (PVC) tube which was used to cover at least 6mm of space around the ear3 The material was mixed using 50% more water than the recommended ratio for good flow4. The material was gently painted over the defect with a brush. The impression material was allowed to set and then carefully removed with a twist motion, away from the undercut area and inspected for accuracy. The impression of the ear on the other side was made in similar manner.
Wax Pattern
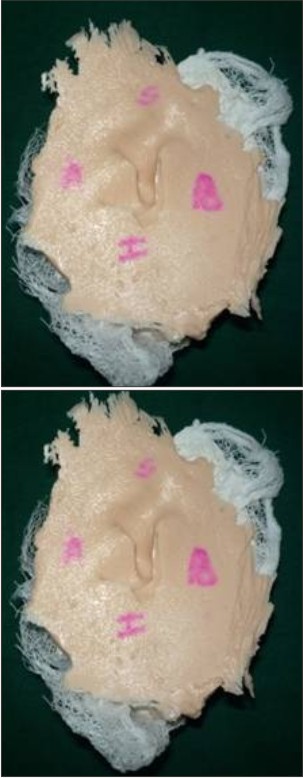
The impressions were poured in a type IV dental stone (Kalrock, Kalabhai Karson Pvt Ltd, Mumbai, India). The previously marked coordinates got transferred on to the cast from the impression (Figure 3). The coordinates provided the necessary orientation around which carving was begun. Before the carving is begun, the model was soaked in water to allow easy removal of wax pattern.
 | Figure 3
|
Type 3 base plate wax (Modelling wax; Deepti, Dental Products of India Pvt Ltd, Ratnagiri, Maharashtra, India) was used to sculpt the wax pattern for ear prosthesis. A hot water bath was used soften and mould the wax. A uniform layer of modelling wax was adapted on to the defective ear models. The helix was formed by adapting a rolled length of wax. The projection of ear was measured to achieve the correct distance. Taking the cast of the normal ear as guideline, the shape, size and contour of defective ear were sculpted in wax. The sculpted ear should simulate the mirror image of other sculpted ear.
Try in
After the ears were sculpted, the patient was called for try-in and following things were verified[5] –
-
The fit of the prosthesis on the tissue. Some distortion was allowed due to rigidity of wax.
-
The correct horizontal alignment.
-
The projection of ear in relation to side of head
-
The integrity of margins during simple jaw movements.
-
Any changes required were carried out at this stage and the sculpted ear was prepared for flasking (Figure 4)
 | Figure 4
|
Investment Technique
The wax prosthesis was sealed to the model and leading edge thinned as much as possible so as to allow silicone edges to feather into natural skin. For easy placement and retrieval a three part mould is necessary.
The first part of the mould was fabricated by embedding the ear model in a block of thick consistency type III dental stone.(Figure 5) The mould was soaked in soap solution. Locations were cut around the helix area in the first piece of the mould which would allow the second piece of the mould to be oriented accurately around the helix. Channels were made for the escape of the excess material during packing. These were filled with base plate wax before fabricating the second part. The second part was fabricated by filling the gap between the helix and the model. At the edges, orientation boxes were made to align the third part of the mould. The mould was soaked in soap solution. The pattern was painted with soap solution to reduce the surface tension. To fabricate the third part, the mould was boxed with modelling wax (Deepti) and type III dental stone (Kalstone; Kalabhai Karson Pvt Ltd, Mumbai, India) was poured to cover the waxed ear completely.
 | Figure 5
|
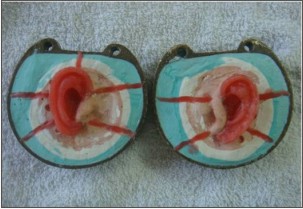
The stone was allowed to set and wax was boiled out leaving a three piece mould (Figure 6).
 | Figure 6
|
Intrinsic and extrinsic staining
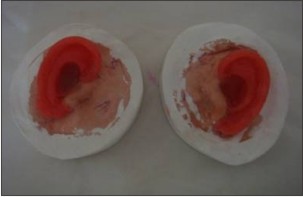
The patient was called for shade matching. Room temperature vulcanized silicone(RTV) (Cosmesil, Principality Medical Limited, UK) was used to fabricate the prosthesis. First the basic skin shades were mixed by matching with patient’s skin. Intrinsic staining of the prosthesis using flocks was done. The mould was then packed with silicone, taking care to avoid air bubbles. The mould should not be over packed as it will make the margins thick and more conspicuous.
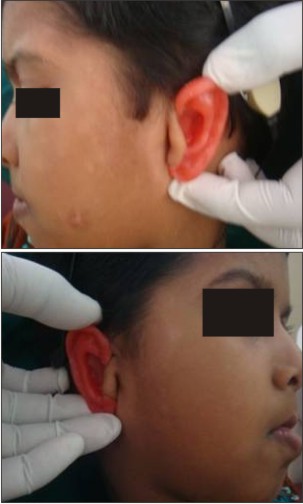
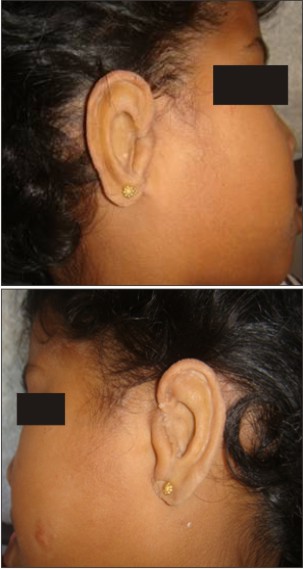
The mould was closed under slight pressure in a bench press. The material is allowed to set for a 24 hours. The prosthesis was carefully retrieved without tearing. The flash was trimmed and modifications of shade were done using extrinsic stains and the prosthesis was allowed to dry. Ear rings was given in prosthesis for better esthetics.At the final appointment, the patient was educated about insertion, removal, maintenance and care of the prosthesis.
Conclusion
The use of addition curing (platinum) silicones for fabrication of ear prosthesis is a good choice. The difficulty in packing of the material into the mould and retrieval of the prosthesis after curing can be solved by fabricating a customized three piece mould.
References
1. Fine L, Robinson JE, Barnhart GW. J Prosthet Dent 1974;31(3):313-322.
2. Brown KE. Fabrication of ear prosthesis. J Prosthet Dent 1969;21(6):670-676.
3. Mathews HF, Sutton AJ, Smith RM. The Auricular Impression: An alternate technique.J Prosthod 2000;9:106-109.
4. Beumer John III.Maxillofacial Rehabilitation: Prosthodontic and surgical correction. St. Louis: Ishiyaku EuroAmerica,Inc;1996
5. Thomas Keith F. Prosthetic Rehabilitation.London: Quintessence Publishing Co;1994.
|