Introduction:
Generally the first features to be noticed of the face to be noted are the eyes . The ill fated loss or absence of an eye may be caused by a congenital defect, irremediable trauma, tumor, a painful blind eye, sympathetic ophthalmia or the need for histological confirmation of a suspected diagnosis[1]. The disfigurement associated with loss of an eye can cause significant physical and emotional problems. Most patients experience considerable stress, primarily due to adjusting to the functional disability caused by the loss and to public reactions to the facial impairment. Replacement of the lost eye as soon as possible is necessary to promote physical and psychological healing for the patient and to improve social acceptance.
One of the most effective methods to rehabilitate an ocular defect is by the fabrication of ocular prostheses. The main goals of the ocular prosthesis are to restore facial esthetics, prevent eyelid collapse and deformity, protect the socket against injuries caused by foreign bodies, dust and smoke, re-establish the correct route of the lachrymal secretion to prevent accumulation in the cavity, and preserve muscular tonus to avoid anti- symmetrical alterations [2]. Ocular prostheses are either readymade (stock) or custom made [3]. Stock prostheses are usually advocated when time is limited and cost is a consideration. No special materials are required for its fabrication; and the use of stock ocular prostheses of appropriate contour, size, and color can provide an acceptable esthetic result. [4]
Case Report
This is a case report of a 60 year old lady who reported with the chief complaint of missing left eye [Figure 1]. Patient gave a history of infection in the left eye 4-5 years back followed by enucleation of the same. Clinical examination revealed a healthy intraocular tissue bed with adequate depth between the upper and lower fornices for retention of the ocular prosthesis Patient was diagnosed of enucleated left eye socket and a custom ocular prosthesis was planned for her rehabilitation.
Technique
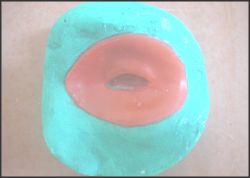
The impression material (non reversible hydrocolloid)) was injected into the left eye socket [Figure 2] and the patient was instructed to perform all the movements of the eye, before the impression material was set. The impression was poured with gypsum to obtain the primary cast. [Figure 3]. Thereafter, a wax spacer was adapted over the defect over which a perforated special tray was fabricated for
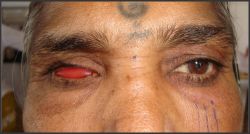
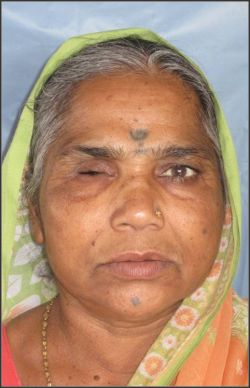 | Figure 1 - Preoperative Photograph Of Patient.
 |
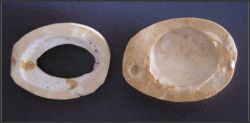
 | Figure 2 - Primary Impression Of The Defect.
|
 | Figure 3 - Fabrication Of Primary Cast With Adaptation Of Wax Spacer.
|
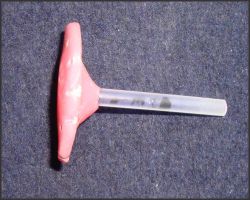 | Figure 4 - Perforated Special Tray.
|
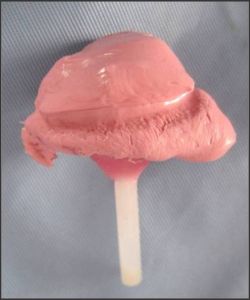 | Figure 5 - Final Impression.
|
 | Figure 6 - Two Piece Master Cast.
|
 | Figure 7 - Scleral Try- In .
|
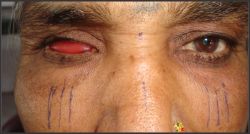 | Figure 8 - Horizontal And Vertical Reference Lines.
|
 | Figure 9 - Final Trial With The Attached Iris.
|
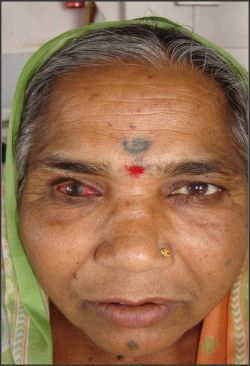
 | Figure 10 - Post Operative Photograph Of The Patient.
|
making the final impressions [Figure 4].
The final impressions were made by expressing alginate into the defect using a disposable syringe. Next the perforated acrylic resin tray was loaded and placed over the defect [Figure 5]. The impression was first recovered from the lower, shallower sulcus first, and then rotated out of the deeper, upper sulcus. The impression was boxed and poured in dental stone up to the height of contour of the impression. A separating agent was placed and the reminder of the impression is poured to obtain a two piece mold [Figure 6].
The wax pattern was made by pouring melted wax through the funnel shaped hole and into the assembled mold. The mold was stored in water for a few minutes prior to filling it with molten wax as it prevented the wax from adhering to the stone. After the wax had cooled, the wax pattern was recovered. Once the wax pattern had been smoothed and polished, it was ready to be tried in the eye socket. The wax pattern was inserted by lifting the upper lid, and the superior edge of the pattern being placed behind the lid and gently pushing it upward. While drawing the lower lid down, the inferior border of the pattern was seated in the inferior fornix, and then the lower lid was released. The eye contours were checked and it was trimmed precisely until it accurately fitted into the socket [Figure 7].
Before the final trial of wax pattern, certain guidelines were marked on the patient's face with an indelible pencil: a vertical midline was marked considering the stable anatomical landmarks and prominent points on the face. The midline was marked passing through the forehead crease, glabella, tip of the nose, and chin. The distance from the right eye medial canthus to the midline and left eye medial canthus to the midline was measured .The patient was asked to gaze straight at an object kept 4 feet away. The vertical lines were then marked coinciding with the medial and distal extremities of the iris of natural eye. Similarly, the horizontal lines referring to the center, inferior, and superior limits of the iris were marked [Figure8]. The markings were transferred onto the sculpted scleral wax pattern, and the stock eye that matched the iris-pupil complex of the contra lateral natural eye was selected and attached to the wax pattern. A final wax trial was carried out and the patients satisfaction was confirmed [Figure 9].
The wax pattern was invested, dewaxed, and packed with heat-cured tooth colored acrylic resin and curing was carried out. After the flask was cooled, deflasking was done, prosthesis was separated from the investment and was polished. It was ensured that the polished prosthesis was free of roughness that could irritate the eye socket and encourage secretions to accumulate for additional irritation.
Prior to the insertion of the polished prosthesis, it was disinfected in a solution of 0.5% chlorhexidine and 70% isopropyl alcohol for 5 min. After disinfection, the prosthesis was rinsed in sterile saline solution to avoid chemical irritation and finally the ocular prosthesis was delivered [Figure 10] and post delivery instructions were given.
References
1. Artopoulou I, Mountgomery P, Wesly P, Lemon J. Digital imaging in the fabrication of ocular prosthesis. J Prosthet Dent. 2006;95:327-30.
2. Taylor TD. Carol stream, Illinois: Quintessence publishing co, Inc; 2000. Clinical maxillofacial prosthetics; pp. 233-76.
3. Cain JR. Custom ocular prosthetics. J Prosthet Dent. 1982;48:690-4.
4. Mazaheri M. Prosthetics in cleft palate treatment and research. J Prosthet Dent. 1964;14:1146-58. |