Introduction:
The need to make accurate impression is fundamental to the practice of Prosthodontics. This necessitates the dental clinicians to make careful assessment of the tissues to be recorded in the impression, type of impression trays, impression material and the techniques to be used. After many informal discussions with academicians, practitioners and lab technicians, we felt that stock metal trays are the most commonly used impression trays. Few among them know about the modification of stock trays to make them more precise. Very few clinicians use custom impression trays for making impression in partially edentulous arches. Conventional practice in removable prosthodontics is to use stock trays for making primary and final impression. The selected stock tray must cover all denture bearing area in over-extended manner. A primary cast with good coverage of proposed denture bearing area gives freedom of using any spacer design with tissue stops within the custom impression tray, thus dictating impression technique and allowing better final impressions. Though, custom impression trays are used for making final impression in complete denture, there is an inadequate knowledge of custom impression tray design among clinicians and most of the clinicians depend upon lab technicians for their designing. Custom impression tray is used to carry, control and confine the required impression material. Many lab technicians also felt the need to modify the primary cast prior to construction of custom impression trays which may be because of inadequacy of many primary impressions to record the desired area of mouth.
In microstomia patient the mouth opening is reduced to 20-30 mm, thus making final impression for partially edentulous situation or completely edentulous situation is very difficult or impossible1. In that situation dentist usually make final impression by the help of sectional custom impression tray , which can be easily inserted intraorally in sections and can be easily reassembled intraorally and extra orally2 .The final impressions made by sectional custom impression trays are as accurate as conventional custom impression tray3 .This article enumerate design specifications of conventional and sectional custom impression trays for completely and partially edentulous situation.
Custom impression trays should be used in partially edentulous situation under following conditions :
1. When stock trays do not cover the proposed denture bearing area.
2. When the stock trays are poorly fitting on the arches leading to sub-optimum thickness of impression material, thus producing the potential for inaccuracy.
3. When there is impingement of tray borders on the tissues.
4. When there is an unusual distribution of missing teeth.
5. When the last tooth in the arch is to be included in the impression. In these circumstances it is common to produce 'drag' in the impression when using stock trays.
6. When mobile teeth are to be recorded with low viscosity impression material, which is most difficult to be confined within the stock tray .
Recommend Specifications
A - Custom Impression Trays For Completely Edentuolous And Partially Edentulous Arches:
1. Material used for making custom impression trays:
a) Pikka-tray material, Type II chemical cure poly-methyl methacrylate contains more filler-particles, which reduces polymerization shrinkage and improves linear dimensional accuracy. Thus, clinicians should encourage the use of this material for custom impression trays to obtain accurate master casts for fixed partial denture instead of conventional chemical cure PMMA resin4.
b) Visible light cure (VLC) dimethacry late resins for completely edentulous and partially edentulous situations offer superior mechanical properties to the currently available alternatives. Although the material is relatively expensive, it requires special light-curing unit for processing and is difficult to trim when cured. Custom impression trays made from this material has sufficient rigidity to be used in fairly thin section and has excellent dimensional stability5. This custom impression tray material can also be used in patients who are allergic to PMMA resins, because of no residual polymer is left In polymerized material .
2. Adequate extension of custom impression trays: The periphery of the tray should incorporate all denture bearing area without distorting the tissue of the vestibules through over extension. Marking primary cast with pencil 2mm short of the vestibule, guides the lab technician to make optimum extensions of custom impression trays which saves clinician's time on adjusting the tray. In partially edentulous situations, the custom impression trays should be kept 3 to 5 mm away from the gingival margin and about 3 mm beyond the most distal tooth.
3. Types of spacer design and the required thickness: Thickness of wax spacer for complete and partially edentulous situations is 1 mm and 2-3 mm respectively. Wax spacer thickness may vary according to load bearing capacity of the tissue and attachment of soft tissue with periosteum. Presence of flabby and mobile tissue over the ridges demands for extra thickness of spacer to allow their undistorted recording in the impressions. The design of custom impression trays for complete dentures depends upon choice of impression material and technique to be used. Impression principle such as muco compressive, minimal pressure, selective-pressure demands for specific spacer design.
The spacer design for the selective pressure is directly governed by the knowledge of the stress bearing and relief areas. The stress bearing areas in the maxillary arch are the horizontal plates of the palatine bone and the relieving areas are mid- palatine raphae and the incisive papilla. For mandible, the primary stress bearing area is buccal-shelf area and relieving area is sharp mylohyoid ridge and crest of alveolar ridge. But views of different authors on how to achieve selective pressure impression are different .
Selective Pressure Impression Technique6 -
Considering the views given by different authors it has been established that no wax spacer placed in primary stress bearing areas allows positive contact of custom impression trays with these areas.This permits selective placement of more pressure in primary stress bearing areas and spacer design reduces pressure in relieved areas, thus it is called selective pressure principle.
5) Tissue Stops: Strategically placed tissue stops provide even thickness of impression material in custom impression trays. Placement of four tissue stops of 2mm width in cuspid and molar regions which extends from palatal aspect of ridge to the muco buccal fold are usually recommended in completely edentulous cases 6 (Table 1). In partially edentulous situations, tissue stops are placed on widely separated three or four non-functional cusps of teeth, (buccal cusp of maxillary and lingual cusp of mandibular). If all teeth are involved a large soft tissue stop can be placed on the crest of the alveolar ridge or in the centre of the hard palate. Tissue stops are made by removing wax at an angle of 450 to the occlusal surface on, that have a tripod or quadrangular arrangement in the arch. This provides stability to the tray and the 450 angulated stops will help centre the tray during insertion.
 | Table-1 Design For Spacer And Tissue Stops For Selective Pressure Theory
 |
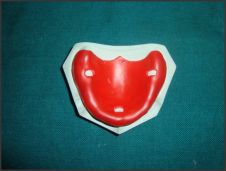
 | Fig - 1 Sharry's design for spacer.
|
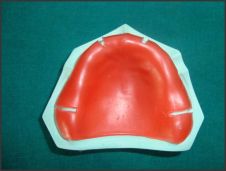
 | Fig - 2 Boucher' s spacer design for Maxillary arch.
|
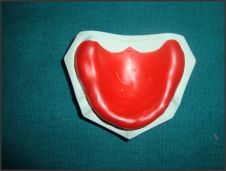
 | Fig - 3 Boucher' s spacer design for Mandibular arch.
|
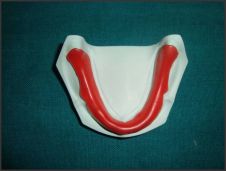
 | Fig - 4 Morrow , Rudd, Rhoads spacer design for maxillary arch.
|
6) Escape holes: After removing wax spacer from inside of the tray, a series of holes are prepared, about 12.5 mm apart in the center of alveolar groove and in the retro molar fossa with no. 6 round bur. The relief holes provide escape way for the final wash impression material and relieve pressure over crest of the residual ridge and in the retro molar pads when the final impression is made7. For good adhesion between impression material and custom impression trays, use of tray adhesives and escape holes both should be encouraged because this provides a chemical - mechanical type of adhesion.
7) Tray handles: Tray handles are useful in loading, orienting and placing custom impression trays in the patient mouth. Tray handles if not properly made can cause potential inaccuracy in complete denture as they distort the lip form and hence functional sulcus is recorded in overextended manner. The handle should be 25 mm long from the edge of the labial border of tray and 12 mm wide. The handle is positioned in the approximate position of the upper anterior teeth so that it doesn't distort the upper lip when the tray is in position. A handle made this way enables the clinician to securely grasp the tray without any interference with the tongue and lips. Two additional handles one on each side are placed in the first molar region. These handles are centered over the crest of the residual ridge at its lowest point and are approximately 19 mm in height. The posterior handles are used as finger rests to complete the placement of the tray on the residual ridges and to stabilize the tray on the correct position with minimal distortion of soft tissue while the final impression material sets . One anterior handle and one or two posterior handles are required for partially edentulous situation with unilateral and bilateral distal extension bases respectively.
8) Polymerization tim: Polymerization time is the time interval between fabrication of custom impression trays and using it for making final impression . This is characterized by polymerization of residual monomer resulting into polymerization shrinkage which exerts significant effect upon the linear dimensional accuracy of master cast 8. All acrylic custom impression tray materials show linear dimensional changes up to 9 hours, but maximum shrinkage occurs up to 30 minutes after tray fabrication. Thus acrylic custom impression trays should be used after 9 hr of fabrication9. If clinical situation demand early use, than custom impression tray seated over the casts should be placed in boiling water for 5 minutes and then cooled to room temperature. Custom impression tray made by visible light cure dimethacrylate resin can be used immediately after completion of polymerization , because complete polymerization takes place and there is no residual monomer is left .
B - Sectional Custom Impression Tray -
Making final impression and fabrication of removable or fixed prosthesis is often cumbersome for microstomia patient , because in microstomia patient the mouth opening is reduce to less than 30 mm and dentist cannot place the smallest stock tray in the patient's mouth1. Thus dentist usually fabricate sectional custom impression trays and sectional prosthesis in microstomia patient.
Limited mouth opening (Microstomia ), which itself is not a disease but manifest as a consequence of certain conditions namely, cleft lip, trauma and burns, Plumber Vinson syndrome , scleroderma, trismus, tempero mandibular joint syndrome, rheumatism, oral sub mucous fibrosis, any damage to masticatory muscle and surgical treatment of orofacial carcinomas .
Sectional custom impression tray are made in various designs like pins10, bolts and LEGO plastic building blocks 10,11 ,cross-pins slots12, Tungsten carbide bur divided into three parts3 , slide locks system1, 4 parallel metal pins and an acrylic resin block 10 (Fig -5,6) nail head and latch back locking mechanism10 , all these designs are added to re approximate the sectional custom impression tray2.
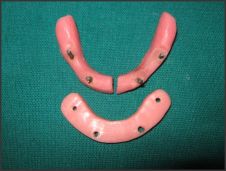 | Fig - 5 Mandibular sectional custom impression tray with 4 metal pins and acrylic block.
|
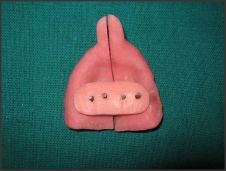 | Fig - 6 Maxillary sectional custom impression tray with 4 metal pins and acrylic block.
|
Sectional custom impression trays are usually designed with two or three sections that could be detached and then joined together intra orally or extra orally in the correct original position after making final impressions. Sectional custom impression trays allows dentist to do accurate border molding , and making of final impression in microstomia patients, thus final prosthesis either removable or fixed partial dentures can be made accurately with the help of sectional custom impression trays3.
C- Digital Impressions -
The misfit of the prostheses is never due to impression material, because manufacturer has made all these impression material accurate and stable. Digital impressions will not solve the problems related to soft tissue management, which is very frequently neglected by dentist while making impression by conventional technique using custom impression tray or stock tray.
Many digital impression software are available in dental market , which uses CAD / CAM technology , soon more clinically efficient and cost effective software will be available . The current digital impression devices which are availa Lava 3M , ESPE , CEREC -1,2, and the latest CEREC -3( Sirona Dental Systems GmbH , Bensheim,Germany) , all these system allow scanning and milling of the prosthesis in office , so final prosthesis can be placed in single sitting .The other soft ware available are i Tero ( Cadent, Carlstadt N.J ), ED4 system ( D4D Technology, Richardson ,Texas) , in these system scanning is done and data is send to lad where milling of prosthesis is done , so final prosthesis can be placed in two visit appointments .
The CEREC -3 Sirona dental implant system was first to use digital impression and CAD / CAM technology and even today it is the most reliable in office chair side system for making in lays , on lays , laminates , single unit P F M crown , all ceramic crown up to 14 units and implant supported fixed partial dentures up to 6 units13.
It is obvious to clinical dentist experienced in the digital impression technique that digital impression require more definitive pre impression isolation of tooth preparation margin than do conventional impression. A digital camera cannot record tooth preparation margin if they are not visible to the naked human eye, and the computer cannot “fake” a margin any better than a human laboratory technician can. To provide an adequate digital image of tooth preparations, the dentist must isolate the margins of all the tooth preparation and ensure that they are visible to the eye before making a digital impression14.
Digital impression appear to be practical and perfect , but it is very costly in respect to indian scenario. Digital impression technology have some limitation like technology cannot be used in making complete dentures and Keneddy class 1 & 2 situtions , where functional imprtessions are needed . Further research is needed in digital impression so that they can be made cost effective in respect to Indian scenario.
Conclusion
Making impression using conventional custom impression tray is common and economic in dental practice . The misfit of the prostheses is never due to impression material , because manufacturer has made all these impression material accurate and stable ,failure of the prosthesis is always multifactor like improper selection of stock tray , pouring and handling of impression materials and improper technique used for making impressions and casting . If dentist take care of all the steps properly than accurate master cast and final prosthesis can be made using conventional impression technique , which is cost effective too.
Picca tray material or Visible light cure ( VLC ) di methacrylate resin material should be used for making custom impression tray . Custom impression tray should be made with optimum extension , specific spacer design, tissue stops, escape holes, tray handles with recommended polymesization time for making removable or fixed prosthesis, because this result into accurate reproduction of impression detail made from different impression techniques . For microstomia patients, sectional custom impression tray is used for accurate border molding and final impressions . Through this article, dental clinicians must be encouraged to make valuable changes in their daily practice by using optimal design of custom impression tray. As a result they may begin to leap the reward of reduced chair side time and good adaptation of final prosthesis and receiving patient's appreciation .
Bibliography
1. Ohkubo C, Watanabe I, Tanaka Y ,Hosoi T : Application of cast iron - platinum keeper to a collapsible denture for a patient with constricted oral opening- A clinical report J Prosthet Dent 20a03 ;90:6-9 .
2. Baker PS, Brandt RL, Boyajian G : Impression procedure for patients with severely limited mouth opening . J Prosthet Dent 2000;84:241-4 .
3. Geckili O, Dent M, Cilingir A, et al : Impression procedures and construction of a sectional denture for a patient with microstomia A clinical report . J Prosthet Dent 1982 ;96-387-90.
4. Manish KS, Vijay K : Comparative evaluation of the accuracy of different materials used for fabrication of custom impression trays to make impression in partially edentulous situations . B F U Dent J 2010;2:9-11.
5. Smith PW, Richmond R, McCord JF. The design and use of special trays in prosthodontics: guidelines to improve clinical effectiveness. Br Dent J 1999;187:423-6.
6. Shetty S, Nag PVR, Shenoy KK. A review of the techniques and presentation of an alternate custom tray design. J.I.P.S 2007; 7: 8-11.
7. Hickey JC ,Zarb GA , Bolender CL , ed , Boucher' prosthodontic treatment for edentulous patient 9th ed CBS . MO :Mosby year book :1990;214 .
8. Goldfogel M, Harvey WL, Winter D: Dimensional change of acrylic resin tray materials. J Prosthet Dent 1985;54:284-6.
9. Pagniano RP, Schied RC,ClowsonRL, et al: Linear dimensional change of acrylic resins used in the fabrication of custom impression trays. J Prosthet Dent 1982 ; 47 :79-283.
10. CuraC, Cotert HS, User A :Fabrication of a sectional impression tray and sectional complete dentures for a patient with microstomia and trismus : A clinical report. J Prosthet Dent 2003 ; 89 ;540-3 .
11. Prasad R ,Bhinde SV , Gandhi PV , Divekar NS , Madhar VN .Prosthodontic management of a patient with limited mouth opening :A practical approach . JIPS 2008 ; 8; 83 -86 .
12. Luebke RJ . Sectional impression tray for patient with constricted oral opening . J Prosthet Dent 1984 :52 :135-37 .
13. Giordano R : Materials for chair side CAD /CAM - produced restorations . J Am Dent Assoc 2006;137 :14 - 21.
14. Christensen GJ : Will Digital Impressions Eliminate the Current Problems with Conventional Impressions? . J Am Dent Assoc 2008;139:761-63. |