Introduction
The resorption process of the alveolar ridge after tooth loss is routinely encountered in patients requiring dental implant treatment. Several methods have been described to augment the alveolar crest before or after implant placement to establish at least 1 mm bony wall around screw type implant. Various surgical widening techniques have been described, including lateral augmentation with or without guided bone regeneration (GBR) and horizontal distraction osteogenesis. Expansion of the existing residual ridge is another method and is referred as ridge splitting, bone spreading, ridge expansion, split-crest[1] or the osteotome technique. This approach creates a sagittal osteotomy of the edentulous ridge using instruments such as chisels between the two cortical plates to expand the ridge width and consequently allow for the placement of implants.
Ridge splitting for root-form implant placement was developed in the 1970s by Dr. Hilt Tatum. Tatum developed specific instruments including tapered channel formers and D-shaped osteotomes to expand the resorbed residual ridge[2]. Summers later revived the interest in this technique; he developed round implant osteotomes suitable for use with commercially available cylinder root-form implant systems [3].
The ridge splitting technique is used to expand the edentulous ridge for implant placement or insertion of an interpositional bone graft[4]. This technique is only suitable for enhancing ridge width. There must be adequate available bone height for implant placement, and no vertical bone defect should be present. A minimum of 3 mm of bone width, including at least 1 mm of cancellous bone is desired to insert a bone chisel between cortical plates and consequently expand the cortical bones.
A pyramidal form ridge with a wider base is the ideal indication for this technique because it will prevent the risk of buccal plate fracture. The risk of fracture of the osteotomized segment is higher in the mandible because of its lesser flexibility due to the thicker cortical plates[5]. If this occurs, bone fixation screws need to be used to stabilize the buccal plate. Ridge splitting is more applicable to the maxilla than the mandible. The thinner cortical plates and softer medullary bone make the maxillary ridge easier to expand. Favourable conditions for the posterior mandible include a long edentulous span (missing molar and premolar teeth), abundant bone height superior to the mandibular canal (>12 mm), and the presence of some cancellous bone between the dense outer cortical plates. If these conditions are not present, the clinician may prefer onlay augmentation.
One advantage of ridge splitting over other ridge augmentation techniques such as bone grafting is that implants may be placed simultaneously, considerably shortening the treatment time. Unlike guided bone regeneration, which relies on bone forming over the exposed implant surface, ridge splitting repositions the cortical plates around the implant. Bone then regenerates within the space between the expanded cortical plates[6]. Other advantages include lesser overall cost, no need of barrier membranes or bone graft materials and no morbidity related to second donor site.
Clinical report
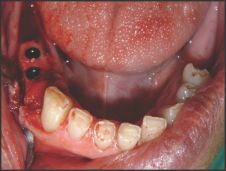
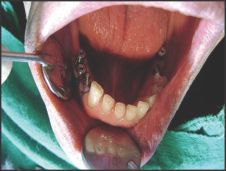
A 55-year-old male reported to the prosthetic department for treatment of fractured mandibular right first premolar, missing mandibular right second premolar and bilaterally missing mandibular molars (Fig. 1). The patient was advised replacement of missing teeth with implant supported fixed prosthesis. Since the mandibular right first premolar was fractured below the gum line, it was decided to extract the tooth atraumatically followed by immediate implant placement. It was decided not to replace missing mandibular right second molar as its antagonist was also missing.
The panoramic radiograph and computerized tomography (CT) scan evaluation revealed adequate bone height for implant placement, but a narrow ridge crest of 3 mm in the mandibular left molar region. Bone width and height were adequate in the right mandibular second premolar & molar regions. Palpation of the bone and ridge mapping were also done to assess the soft tissue in the areas of proposed implant placement.
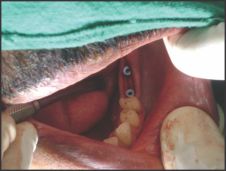
At the time of the surgery, following bilateral block local anaesthesia, an incision was made buccal to the ridge crest on the left side to provide more attached tissue along the facial aspect of the implant. Minimal mucoperiosteal flap reflection was performed to expose only the ridge crest. The periosteum along the lateral cortices was left intact to ensure blood supply to the underlying bone. A scalpel with a No. 15 BP blade was used to begin the osteotomy. The osteotomy bisected the ridge crest to separate the cortical plates. A mallet was used to advance the scalpel blade through the bone. After the scalpel blade was tapped to depth, it was gently removed with a back and forth motion, parallel to the cut, to prevent breakage of the instrument. The length of the osteotomy along the edentulous span was extended well beyond the planned implant sites to allow the plates to expand or bow during preparation of the osteotomy and implant insertion. Chisels of increasing width and a mallet were used to further enlarge the osteotomy to a point 4-5 mm shorter than the final length of the implants to be placed (Fig. 2). As the bone was found to be less dense, it was decided to use osteotome for completing the osteotomy at implant sites. The no. 15 BP blade was used with the help of mallet at proposed implant location to expand the osteotomy till final depth of implant. Subsequently, D-expanders (Fig. 3) and round osteotomes were tapped into implant sites alternatively in increasing order of size till the desired diameter for the planned implants was achieved (Fig. 4). Tapered implants (Alpha-Bio Tec, SPI- 3.75mm × 13mm, Petach Tikva, Israel) were inserted slowly as they demand less expansion at the base of the osteotomy and allow more gradual bone expansion during implant advancement. The cover screws were placed and tissue was approximated with 3-0 silk sutures (Fig. 5).
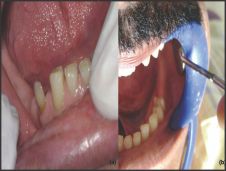 | Fig. 1: Pre operative photograph right side (a) and left side (b)
 |
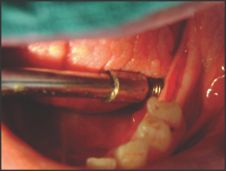 | Fig. 2: Initial ridge splitting with BP blade, chisels & mallet
|
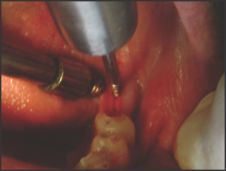 | Fig. 3: D-expander being used for implant site preparation
|
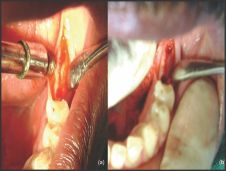 | Fig. 4: Initial osteotomy (a) and final osteotomy (b) achieved with D-expanders & round osteotomes
|
 | Fig. 5: Implant fixtures in expanded ridge
|
On the right side, the mucoperiosteal flap was reflected using a crestal incision. The mandibular right first premolar was extracted atraumatically with use of a periotome but the socket exhibited dehiscence of the buccal plate. Implant placement was therefore delayed in this region; extraction socket was curetted and filled with a mix of autogenous & allogenic bone graft. Implant fixtures (Alpha-Bio Tec, SPI- 4.2mm × 13mm) were placed in the mandibular second premolar & first molar regions following conventional osteotomy (Fig. 6).
 | Fig. 6: Placement of implants on right side & bone graft in extraction socket of first premolar
|
After 6 months, second stage surgery was performed for implant uncovering on both the sides and single stage immediate loading implant (Hi-Tec, TRX OP- 3.3 mm ×13 mm, Herzlia, Israel) was placed in mandibular right first premolar region followed by placement of healing abutments on all earlier placed implants (Fig. 7). Following a healing period of 5 weeks, impressions were made and splinted metal-ceramic crowns were fabricated for all the implant fixtures (Fig. 8).
 | Fig. 7: Healing abutments in place with immediate implant placement in right mandibular first premolar
|
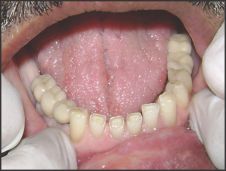 | Fig. 8: Splinted metal-ceramic crowns in place
|
Discussion
Clinical experience has shown that the ridge splitting technique can be a useful method for managing the narrow residual ridge. It allows placement of implants in a narrow crestal ridge in a single procedure. Chiapasco et al evaluated the success of different surgical techniques for ridge reconstruction and success rates of implants placed in the augmented areas. The surgical success and the implant survival rates were as high as the guided bone regeneration and onlay graft procedure[7], with the advantage of a shorter treatment time. Careful preparation of the bone and maintenance of an attached periosteum are critical to the formation of new bone around the interproximal surfaces of the implants. Wound healing in these cases is similar to the fracture repair of bone. The gap fills with a blood clot that organizes and is replaced with woven bone that later matures into load-bearing lamellar bone at the implant interface[8]. In cases of buccal plate fracture, the mobile plate may be retained with bone fixation screws.
Generally, mandibular bone has higher density compared with maxillary bone, requiring sometimes a different approach in ridge splitting. In some cases it is advised to place several holes in buccal cortex with a round bur vertically beyond the proposed implant sites and to join them with horizontal row of holes. During expansion, this will cause green-stick fracture of buccal plate but it will remain attached in its position.
Conclusion
This article describes implant placement in atrophic mandibular alveolar crests using the ridge-splitting technique. The correct indication associated with careful clinical manoeuvre of the ridge-splitting technique allows predictable placement of implants even in narrow alveolar ridges. A significant advantage of this technique is that it allows simultaneous implant placement. Proper patient evaluation and case selection is essential to achieving a successful surgical and prosthetic outcome.
References
1. Shimoyama T, Kaneko T, Shimizu S, Kasai D, Tojo T, Horie N. Ridge widening and immediate implant placement. Implant Dent 2001; 10: 108-12
2. Tatum H. Maxillary and sinus implant reconstructions. Dent Clin N Am 1986; 30: 207- 29.
3. Summers RB. A new concept in maxillary implant surgery: the osteotome technique. Compend Contin Educ Dent 1994; 15: 152- 60.
4. C.M. Misch. Implant site development using ridge splitting techniques. Oral Maxillofacial Surg Clin N Am 2004; 16: 65-74
5. Enislidis G, Wittwer G, Ewers R. Preliminary report on a staged ridge splitting technique for implant placement in mandible. Int J Oral Maxillofac Implants 2006; 21: 445-49
6. Scipioni A, Bruschi GB, Giargia M et al. Healing at implants with and without primary bone contact. Clin Oral Impl Res 1997; 8: 39- 47.
7. Chiapasco M, Abati S, Romeo E, Vogel G. Clinical outcome of autogenous bone blocks or guided bone regeneration with e-PTFE membranes for the reconstruction of narrow edentulous ridges. Clin Oral Implants Res 1999; 10: 278-88.
8. Hollinger J, Wong ME. The integrated processes of hard tissue regeneration with special emphasis on fracture healing. Oral Surg Oral Med Oral Pathol 1996; 82: 594- 606. |